In this blog Marjolein takes you through the making of 3d flowers in epoxy coasters. After reading this fun DIY you will know exactly how to make the 'flower pattern effect'.
I am Marjolein An van Velzen, 36 years old and single mother of a son. I love art and making art. On Instagram you can find my profile under the name marjoleinan87. You will see more snakes (pet) there than art, but I make more and more fun videos and photos of my art. In this blog I will teach you step by step how to create the 33 flower effect in epoxy casting resin, super fun to do and super beautiful, I think.
Make sure you have all the supplies you need and your work table is level. I use itsOkay's UltraEpoxy resin to create the flower effect.
2. Mix the epoxy and let it become viscous
Calculate how much epoxy you need to fill the silicone mold completely and take half of this. We are going to pour this mold in 2 parts. When you order molds from itsOkay, the product page indicates how much epoxy goes into the mold. Super handy! Weigh the epoxy accurately and stir well for at least 5 minutes. Also scrape along the side and bottom of the (silicone) mixing cup . For the 3D flower effect it is important that the epoxy becomes a bit thicker. I therefore let the epoxy rest for about 30 minutes.
3. Pouring the first layer of clear epoxy
Pour a thin layer of clear epoxy resin into the epoxy mold. Pour the mold until about half full. Make sure you have a little epoxy left in your mixing cup. We will use this for the next step. Did you get air bubbles while pouring the first layer of epoxy? Spray the epoxy 1-2 times with the Bubble Blaster to pop them. For a geode effect you can add some gold chunks in the middle of the mold.
The prep work is done. The transparent epoxy resin should have poured to about 1/2 of the mold. Stir the epoxy mixture you have left for a few more minutes and check if it is getting thicker.
4. Add alcohol ink
Drop different colors of pinata alcohol ink on top of the clear layer of epoxy. You don't need to add a thick layer of ink. A few drops of alcohol ink per color is more than enough.
5. Add white pigment paste
To create the flower effect in the epoxy you only need a small amount of white pigment (sinker). If all goes well you should have some epoxy left. If not, mix a small amount of epoxy. Then add a little pigment to the epoxy.
The epoxy with the pigment can now be added to the flower with a (wooden) stirring stick. You do this by drawing circles from the inside out. It will look something like this:
Now you might be thinking "That doesn't look like a flower at all: it looks like a mess", but the epoxy does the rest of the work. Epoxy resin doesn't stand still while curing: it is constantly moving and turning towards the center. And in doing so, it pulls the resin and pigments with it. You will see the flower pattern you have created quickly emerge!
6. Creating the 'flower effect'
Now comes the fun part: making the petals. Take a toothpick and draw lines (without scraping the bottom of the silicone mold) from the outside of the silicone mold to the center. See the photo below on the right how this will look.
After this, draw a line through the center of the petals in the same way. Work from the center to the edge of the silicone mold. Then spray the epoxy 1-2 times with theBubble Blasterto pop any air bubbles and let the epoxy cure for at least 24 hours.
7. Pouring the final layer of epoxy
I am now going to pour the last layer (the background). Calculate again how much epoxy you need to fill the silicone mold completely and take half of this.Weigh the epoxy accurately and stir well for at least 5 minutes. Also scrape along the side and bottom of the (silicone)mixing cup.
You can determine the color of this last layer entirely yourself. For the best effect I often use a deep opaque black color. Add the black paste pigment to the epoxy mixture. Make sure you use enough pigment so that the color is fully opaque.
Pour the epoxy mixture with the black pigment on first and fill the mold completely. Remove any air bubbles again with the Bubble Blasterand let the last layer of epoxy cure for at least 24 hours.
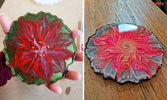
Another new day and finally time to view the end result: how nice!
Here they are: the results! They turned out beautiful.
Are you also excited about this? Quickly make your own epoxy coasters with flower pattern. Tip! Use the Ultraepoxy premium and itsOkay paste pigments . The Ultraepoxy is a high quality art epoxy especially for making resin art. This epoxy also works very easily!
More information?
Do you have questions about making art, jewelry or casting/coating floors or other objects? At itsOkay, several epoxy experts work with each their own expertise. We are happy to help you. Please contact itsOkay customer service or take a look at the Epoxy knowledge center .
Comments
Beste Walter,
Klinkt als een gaaf project! Dit is niet zomaar even gedaan en daarom erg belangrijk dat je de juiste stappen volgt. Als je met epoxy werkt kan je heel veel verschillende effecten en technieken gebruiken, alles is dus vrijwel mogelijk. Zoals je aangeeft kan je ook figuren in de tafel creëren. Voor dit project raden wij onze Ultra Epoxy aan. Deze is zeer geschikt voor dit project, heeft een zeer hoge kwaliteit en is UV bestendig. Als de tafels buiten staan is het zeer belangrijk om een UV Blocker te gebruiken, dit is om vergeling tegen te gaan(zonlicht).Tegen luchtbellen die je kan krijgen in epoxy raad ik je onze Bubble blaster aan en/of mini gasbrander. Mocht je nog vragen hebben, mail ons gerust.
Dankjewel voor de duidelijke uitleg
Hallo ik heb een vraag, ik moet voor een iemand 20 terras tafels met epoxy gieten . Het zijn bestaande tafels met aan de zijkant een randje van 5 a 6 mm. Dus niet veel. De tafels zijn 1.14 m in vierkant, daar moet de zwarte epoxy in. Er komen ook wat witte wolken of figuren in. Is dit mogelijk? Kan je er een kop hete koffie of thee op zetten ? En welke soort epoxy gebruik ik daar het beste voor?
Dank u 👍
Do you also like to craft and develop your creativity? Then itsOkay is the store for you! ItsOkay is the Epoxy Specialist of Europe. Active since 2018 and therefore a large online epoxy store for more than 6 years.
In addition, our epoxy specialists always work transparently and give you honest and personal advic


Comments
Beste Walter, Klinkt als een gaaf project! Dit is niet zomaar even gedaan en daarom erg belangrijk dat je de juiste stappen volgt. Als je met epoxy werkt kan je heel veel verschillende effecten en technieken gebruiken, alles is dus vrijwel mogelijk. Zoals je aangeeft kan je ook figuren in de tafel creëren. Voor dit project raden wij onze Ultra Epoxy aan. Deze is zeer geschikt voor dit project, heeft een zeer hoge kwaliteit en is UV bestendig. Als de tafels buiten staan is het zeer belangrijk om een UV Blocker te gebruiken, dit is om vergeling tegen te gaan(zonlicht).Tegen luchtbellen die je kan krijgen in epoxy raad ik je onze Bubble blaster aan en/of mini gasbrander. Mocht je nog vragen hebben, mail ons gerust.
Dankjewel voor de duidelijke uitleg
Hallo ik heb een vraag, ik moet voor een iemand 20 terras tafels met epoxy gieten . Het zijn bestaande tafels met aan de zijkant een randje van 5 a 6 mm. Dus niet veel. De tafels zijn 1.14 m in vierkant, daar moet de zwarte epoxy in. Er komen ook wat witte wolken of figuren in. Is dit mogelijk? Kan je er een kop hete koffie of thee op zetten ? En welke soort epoxy gebruik ik daar het beste voor? Dank u 👍