A personalized item makes the gift extrauniqueand personal. You can make the most beautiful maternity gifts to give away yourself. Because a maternity gift can be special. In this manual we show you how to make nice maternity gifts or baby accessories.
Personalized items are extremely popular these days, as they add a unique and personal touch to gifts or epoxy creations. To make these nice maternity gifts (or baby accessories) we use the silicone mold baby keychains. You pour epoxy resin and decorations or colors of your choice. Let it harden for a while and you have made the nicest unique keychains! In this manual we use the latest sticker printer from ItsOkay to add texts or names.
Because we are going to make keychains with text, we will work with two layers. First we pour a thin layer of epoxy, which can be transparent or with color and glitter. Once the first layer has hardened, we stick the sticker we made with the sticker printer on the key ring. Then we do the last layer, which must be transparent. The silicone mold has 8 molds and we pour approximately 15 grams of each mold as the first layer. Always useful to make just a little more epoxy. The amount of epoxy I make is 120 grams.
Step 2 – Filling the mold
Fill the mold with the epoxy, 10 grams per mold is enough for a first layer. I chose different colors, glitter and other decorations such as small real dried flowers. In the romper I use dried flower in pink with matching glitter!
Step 3 – Allow to harden
Allow the epoxy to harden for at least 12 to 18 hours before sticking text on it. I create the text with the handy sticker printer from ItsOkay. You can easily create the texts via the printer's app, called: Phomemo. I make the sticker on transparent paper, this way you ensure that the sticker is least noticeable. Cut off as many edges of the stickers as possible (this to ensure that the sticker is the least visible!) and stick them on the epoxy in the mold.
Step 4 – Second coat of epoxy
After you have applied the stickers you can cover the mold with the last layer of epoxy. For the final layer (as a top coat) we create a new amount of epoxy resin. This time you make 80 grams of epoxy. For the best result, you can ensure that the epoxy is just slightly convex above the mold.
Step 5 – Finishing the Keychain
When the epoxy has completely hardened you can remove it from the silicone mold. You can place the letter as a decoration, you can make a word/name with multiple letters. And of course you can make a key ring from the letter. You can drill a hole with our electric hand drill and screw in a thread and voilà. You have created your own personal keychain!
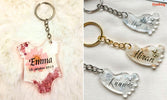
Nice ideas!
Below are some fun ideas that you can also see in the photos!
Process birth details in the mould
Apply colors from the birth announcement card
Clear with dried flowers
Glitter! Lots of glitter!
Gold or silver foil with name
Decoration mix with fruit or flowers
Have fun casting this fun baby mold!
Love Petra from DoorPetra.nl
More information?
Do you have questions about making art, jewelry or casting/coating floors or other objects? Several people work at itsOkayepoxy expertseach with their own expertise.We are happy to help you. Please contact thecustomer service from itsOkay or take a look at itEpoxy knowledge center .
Do you also like to craft and develop your creativity? Then itsOkay is the store for you! ItsOkay is the Epoxy Specialist of Europe. Active since 2018 and therefore a large online epoxy store for more than 6 years.
In addition, our epoxy specialists always work transparently and give you honest and personal advic