Do you want to make a chakra pendant completely to your taste? Then read on quickly. Y ou can make a chakra pendant in the shape, color and size that you want. After reading this DIY, you will know exactly how to make such a chakra orgonite pendant.
My name is Jessica Immen. I am 39 years old and have been working as an artist with epoxy casting resin for a long time and was given the opportunity to write a manual on making chakra pendants. I ordered all the supplies at itsOkay and quickly had all the items at home. I got started with great pleasure.
Step-by-step plan for making a Chakra pendant
Brief look at the functioning of chakras and gemstones:
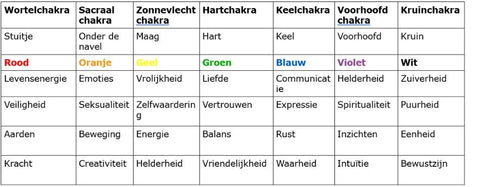
As I already mentioned, I like working with gemstones . Just like with colors, the stones have a healing, supportive effect and they bring the body and mind into balance. This is due to the energy they radiate. This is absorbed into your own aura/energy field around you. You can wear gemstones in jewelry, but you can also place them in a room. For example in the living room or bedroom. Or use them in meditations and healings. Then you can place them on the chakra points of the body or around the body. Chakras are energy points. Chakra literally means `wheel`. You can imagine it as a vortex of energy. The best known are the 7 chakras below. I will briefly explain to you what they are called, where they are located in the body, the color that resonates with them and what they stand for.
To balance all these chakras, you can make this piece of jewelry and wear it as a necklace. The colors are reflected in the pendant and there are rock crystals in it.
It is nice for yourself, but also special to be able to make for your family or friends. Nice as a gift to give for a birthday or if they have certain problems. Think of fears, sadness, depression, low energy, being airy-fairy, if they have difficulty putting something into words, are easily distracted, need insight or with physical complaints. Of course this is not the solution for all problems. Always consult a doctor! This can be supportive and provide relief. If it doesn't help, it doesn't hurt.
On the internet you can find a lot of inspiration for making jewelry with epoxy resin. I chose a chakra pendant with colors and gemstones, but you can also make it in other colors. Choose what you like.
Step 2: Buy items
The supplies I used come from Epoxy shop itsOkay. Here you can find almost everything you need to make art with epoxy. The delivery time is on average 1 working day. Put all the supplies you need together and make sure you have a clean workspace.
In this example I use the UV Resin , because this resin hardens within a few minutes. This is handy because you can continue working immediately. You can choose a two-component epoxy casting resin, but it must harden for at least 24-48 hours per layer.
Step 3: Pouring the silicone mold
Take the silicone mold you have chosen and pour a small layer of UV Resin of about one centimeter into it.
Step 4: Add Color
Start with the red color pigments. Drip a drop on a plate and dip a skewer in it. Stir the skewer with the pigment through the UV Resin . Make sure you work neatly and that the sides of the mold remain clean.
Step 5: Add Gems
Now take 1 gemstone and place it in the mold with the UV Resin. Carefully press the whole thing with the skewer so that the gemstone is well immersed. Then wipe the skewer clean on a paper towel for example.
Step 7: Curing the resin
In this example I use the UV Resin, because it hardens within a few minutes. This epoxy dries by means of UV light. You can do this outside in the sun (also works when cloudy) or briefly under a UV Led Lamp .
Place the silicone mold under the UV lamp and cure the first layer. One to two minutes is usually enough. This UV lamp is not high enough for the silicone mold crystal pendant (the mold I use) so I raised the lamp a bit.
Step 8: Repeat steps 3 through 7
Repeat the above steps. Pour the silicone mold in layers up to the purple/last layer. The order in this example is like the colors of a rainbow. Red, orange, yellow, green, blue, purple. First let the top harden for a few minutes under the UV LED lamp and then turn the silicone mold over so that you can also let the sides harden for a few minutes.
Step 9: The final layer
Now that you have reached the last layer, you can add pigment color to the epoxy as in the previous steps. Do not use gemstones in the last layer of the chakra pendant. You are going to place the screw eye in it and there must be enough space for it. I attached the screw eye to a sturdy wire and held it above the mold. You do this while the epoxy is curing. Within a few seconds the screw eye will be rock solid.
Step 10: Remove from the mold
When your chakra pendant has fully hardened, you can remove it from the mold. Because the screw eye is attached, you can pull it out quite easily. If you did not put a screw eye in it, you can remove the pendant by rubbing the mold between your hands. Is your epoxy creation still sticky? Then let the pendant harden for a few more minutes per side and make sure there are no fingerprints on it.
Step 11: Attach pendant to chain
Attach 1 or 2 rings to the screw eye. You can do this with pliers . Bend and squeeze the rings well. After this, hang the pendant on a chain . To finish your pendant completely, you can stick an orgonite chakra sticker on it. After this, it is finished and you can show off your homemade Chakra jewelry with gemstones!
More information?
Do you have questions about making art, jewelry or casting/coating floors or other objects? At itsOkay, several epoxy experts work with each their own expertise. We are happy to help you. Please contact itsOkay customer service or take a look at the Epoxy knowledge center .
Do you also like to craft and develop your creativity? Then itsOkay is the store for you! ItsOkay is the Epoxy Specialist of Europe. Active since 2018 and therefore a large online epoxy store for more than 6 years.
In addition, our epoxy specialists always work transparently and give you honest and personal advic